There are so many sweet animations available on the
internet.
Sometimes you want to use it in a creation, but you don't know
how you can do that.
That's just the reason why I decided to write a tutorial for
you.
The zipfile contains a little animated gif, but you can use any
animated gif you want.
Step 1
Open the animated gif in Animation
shop.
File - Jasc Software Products - Launch Animation shop
You can see now how many layers the Gif contains
My animation contains 10 layers.
Edit - Select all
File - Transport frames - to Paint Shop Pro
It will be automatically in PSP now.
In your layer pallet you can see that all the 10 are there now.
The size of this picture is 100 x 120 pixels.
You can see it in the right bottom corner from your screen.
Image- Canvas size
You'll get a window now where you can choose the new size
of your animation.
Fill in Width 300 and Height 300
If you don't do anything else your animation will be placed in the
centre of your image now, and
that's not what we want.
So fill in the rest just like in the example below:
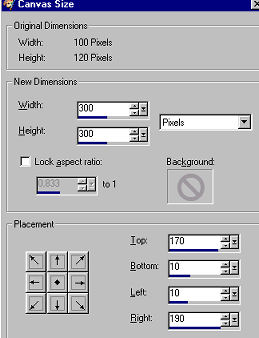
Now the animated gif is in the left bottom corner.
By playing with this settings, you can place the gif anywhere
you want.
Step 2
Now lock all the layers except layer 1(lijst 1)
Select lijst 1 by clicking on it in the layer pallet
Layers - Arrange - Send to Bottom
Add a new layer (Very important, so don't forget!)
Selections - select all
Selections - Modify - Contract -
10 pixels
Selections - Invert
You will have a 10 pixel border now
Flood fill it with a color, gradient or pattern....just what you
like
I've used the color #f38e9c
Effects - choose a nice effect for your border
I've used Fine leather
Selections - select none
Click once in the centre of your image with your magic wand
(tolerance 20)
Flood fill it with a soft color from the animated gif
I've used the color #feffdb
Selections - select none
Stamp a nice brush in your image or use your
Picture Tube Tool
Select your Text tool and write your name or an other
text in the image (floating)
Drag it were you want it and add some shadow to it.
Step 3
Now lock the layer with the animation
If you have more than one new layer (because you used a tube or
so) MERGE VISIBLE these layers.
You will have lijst 1 up and including lijst 10, and you will
have one raster layer or merged layer.
Duplicate this raster layer (or merged layer) nine times, so you
will have 10 of these layers too.
Lock nine off these layers and open lijst 1, just as in this
example (select the bottom layer)

Layers - Merge - Merge VISIBLE
Close the merged layer.
Open the next copy and lijst 2
Layers - Merge - Merge VISIBLE
Close the merged layer
Open the next copy and lijst 3
Layers - Merge - Merge VISIBLE
You merge all the layers like this, until you have 10 merged
layers left
Open all 10 merged layers.
Select the bottom layer
File - Save as type- Animation Shop (second in the list)
Name it tutorial 19
Step 4
Go back to Animation shop now
Open the Animation shop Wizard (Under file)
Select:
Same size (next)
Transparent (next)
Center and canvas color (next)
Yes, repeat and 20 seconds (next)
Add image and search for tutorial 19
File type is Paint Shop Pro image!!
Open the image tutorial 18 (next)
Finish
By clicking here
 you can see your animation
File - save as- choose a name and select a folder.
I hope this tutorial will help you
to make nice creations by using an existing animation
You can use it for a cute nametag for instance.
I would like it if you let me know whether this tutorial was
instructive for you.

|